Friday, September 10, 2010

More Good Friends

We had one or two trees that had been cut down behind the barn, and our neighbor, who happens to be a logger, said he'd take them and mill them into boards. That was a year ago, and he never came to get them. I even called him and he never got back to me. Bummer.

Luckily, the husband of the local market manager is one of the typical Vermont men who can do any and all things involving tools. Not only does this guy have his own mill, which he built, but he's got a backhoe and a truck. He came over (when he said he would), checked out the logs, and said he'd be happy to come over, drag them out, and mill them into wood. His name is CI.

The guy knows everything there is to know about trees and plants, and he gave me a lesson in grafting and growing fruit trees, which we'd like to do. He also offered to help me cut down some pines and clear some space for hardwood trees (maples, oaks, and ash) to grow, which I'd like

I also asked him to mill the maple into 2X12 boards, which I'd like to use for the front door step of our house, as well as for countertops on the new barn, and maybe a table or island top. We'll see. It would be even cooler since the wood was cut from the property. For whatever reason I kind of like that idea.

Until the next time, thanks for reading, and thanks to John Nyberg for the pic.

Wednesday, September 8, 2010

Installing the Door

In a testament to human fortitude and determination (or rather the miracle of JH's magic bag of tools), we managed to get the door in, and not a day too soon. The weather is getting cool.

JH really came through because he came over on Tuesday, which is earlier than usual, but he may have sensed an air of desperation in my voice because I needed to get that door in before it got too cold.

Whatever be the case, he came over after his work and we went to work. Because it was late, at some point we needed to work by night light, but by that point, most of the work had been done.

I will say this, getting that thing in was a lot easier than getting it out. You begin to realize why S&MG did things the way they did, and having not emulated their ways, it could very well come back to haunt us, but what else is new? Afterward we had some food with, of course, a beer. What else would a real man in training (RMIT) do?

It sure felt good to get that thing in, and yet another example of taking on a project that was incredibly daunting and intimidating, but growing by leaps and bounds from having gone for it. The alternative would have been to hire someone to do it and simply be an observer. This is not acceptable for a RMIT, and a good lesson to apply to life as a whole, not just building.

Now I've got to seal the cracks, then work on that step, but let me bask for a moment in the warm glow of accomplishment... okay, I'm finished.

When you're a RMIT, you savor these moments. Until the next time, thanks for reading.

Sunday, September 5, 2010

Framing and Sheating

I spent the greater part of last Saturday framing and sheathing the front door, which of course meant NO DUMPLINGS. Amazing how a little piece of food can eat up (no pun intended) so much of your time. Anyway, it went okay, even though I was all by my lonesome.

JH and I put up the header and framed the door and windows, and then it was up to me to get the sheathing and Tyvek up. Thankfully I had sheathing and Tyvek left over from the barn.

One the windows and doors are in, I'll need to weatherize the seams, then put in siding, but that may not happen until next year. Of course, if I follow that time frame, I'll be sleeping in the barn. The goal is to get it done ASAP, but we'll see how that goes.

Saturday, September 4, 2010

Let's Not Forget About Dormers

I can't forget about the dormers. I've finished replacing the clapboards and siding, not to mention caulking the vertical seams, and now I can paint. I should be able to get to it before the new year, but then again, you never really know.

Just a quick side note, I'd run out of clapboards and was bummed about having to get more, mainly because it's a pain going to the lumber yard, but then I found a leftover board from my previous siding excursion last year, and it was already primed.

Talk about a score.

Thanks for reading.

Frame of Mind

JH came over on Thursday and we had a power building session. It was intense, complicated by the fact that S&MG, the previous owners, were so hardcore about building that their attention to details made it that much harder to break things down. Then again, this process was also made more difficult by the fact that we wanted to save the doors and windows. It would have been much easier, not to mention faster, if we could have just ripped everything out and bought new stuff.

With greater challenge comes greater reward, as the saying goes.

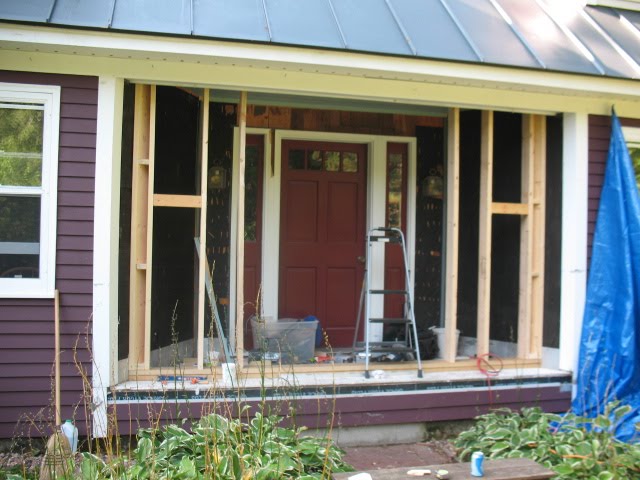
With a lot of the framing already done, we could focus on the job at hand, which was to remove that darn door. Let me tell you, on more than a number of occasions, I wanted to quit and call a contractor, it was that hard. Now I'm no expert, but from past experience, I assumed you framed a RO so that it was bigger than the door, and this made it possible to lean the thing in, or out, depending upon what you're doing.

This RO was tight to the door, almost as if they set the door in and then built the frame around it so that there was no space. I couldn't believe it. Again, if we could have simply knocked the thing out with a sledge hammer, it would have been much simpler. Also, because it was so hard to remove, I assumed it had been nailed in on the top and the bottom, which is unorthodox, but you never know.

It turns out that was not the case, it was just in tight. We ended up spending about 2 hours essentially tapping the door out, millimeter by millimeter. When we finally liberated it and the door frame popped out, I felt like I'd just given birth. I think JH and I bruised each other's backs from patting them so much.

However, it wasn't over yet. We now had to remove the side windows. Again, these things were so tightly installed that I swear they framed them after installing them. Then again, that's what they invented Sawzalls for. We basically cut and pounded out the framing to get that thing out. To add to the challenge, they used some sort of industrial strength glue to hold the thing in, which we had to rip out.

By the time we had removed everything, 8 hours had passed. BTW, kudos to A&N for being so patient and not making a stink about being holed up at home while we worked. To aggravate the situation, it was one of the hottest days on record, but we were working in the shade.

We slid the door into the newly framed RO, and it practically brought a tear to my eye. I really wanted R to see it so that she wouldn't think I'm a total loser when it comes to home improvement, but it may be too late for that. Whatever be the case, we had to remove the door (more tears to my eyes) because we can't install the thing until the sheathing is up and it's covered with housewrap (i.e., Tyvek). Such is life.

At least we've tasted the fruits of our labors, and for now, that will do.

Until the next time, thanks for reading.

Wednesday, September 1, 2010

Search for Studs

Searching for studs, the story of my life. We need to secure the frame to the joists, but the question becomes, how to find the ceiling joists. Actually, the ceiling boards are nailed to something, which I would assume are the joists, but can I be sure?

Enter modern technology. I went to Home Depot, feeling more and more like a real-man, of course, and bought a stud finder. I had one which stopped working, and when it did work, only worked on drywall. I needed something a bit more serious, and found one with a "deep-stud" function. How cool is that?

The minute I got it home, N wasted no time in opening it and figuring out how it worked. You could hear the beeping of the detector throughout the house as he experimented with its sensitivity. I then set about installing the frame.

I first installed a second PT sill plate over the first, then had to decide how to install the studs. Should I go perpendicular to the sill, or flush with the wall, which is at an angle. I went with the latter, which brought up question #2. Should I place the second stud flush with the first stud, or should I space them apart? This is complicated by the fact that the first stud is at an angle, and the second stud will be directly perpendicular to the sill (see pics for some insight into this).

This time, I opted for the former. My thinking was that I would put the second stud right next to the first and then fill the small gap with expanding foam. Then I'll stuff insulation into the gap before nailing the sheathing. How's that for a plan?

With the studs and the top plate secured, I then screwed the top plate into the joists, which I could now find with my "bionic" stud finder, which worked beautifully.

With the outer frame in place, I could now set about framing the door and side windows. I measured the entire span of the door/windows and then marked off that amount of space on the new frame. My plan was to work within these boundaries to frame in the door, and then await the arrival of Bob Vila's doppelganger, JH, to actually move the door and windows. This should be good.

I did not secure the door studs for fear of making a mistake. Then again, that's the beauty of framing. If you make a mistake, simply break out the sledge hammer and fix-away. I love that.

At the very least, I'll discuss with JH on the optimal placement of the door/studs. He's much better at taking careful measurements, not to mention being organized and cleaning up after himself.

Until the next time, thanks for reading.

Nature Consultant and Funny Coincidence

We have this large bush growing in our backyard that is reaching gargantuan proportions. I've never really quite seen anything like it, and because it is isolated and has a rather planned look to it, I assumed it was planted by the previous owners and has a decorative purpose.

Not so, say my wife and kids. It's a weed, they say, and needs to be taken care of. I was more reluctant to embrace this view, so knowing that we have a resident nature guru in our community (the depth of her knowledge is amazing), I had A cut off a branch, with the berries, and bring it to the market for MH to look at.

Sure enough, she knew right off the bat what it was: pokeweed, or poke berries. The produce these beautiful purplish black berries in the Fall. MH even went into the library and checked out a book on the subject for us. How's that for service?

According to the book, the plant is considered a weed in this country, but in England, it is coveted in gardens. So the question is, what should we do with it?

I've always found it rather interesting, but it is getting enormous.

Also, in a funny coincidence, AA came to the market with a branch of a plant she couldn't identify that she'd found on the trail. Sure enough, it was pokeweed, as well. MH sent her over to our booth to share in the wonders of the coincidence.

Until the next time, thanks for reading, and thanks to PALMER W. COOK for the pic.