Friday, February 25, 2011

Tweaking Our New Light

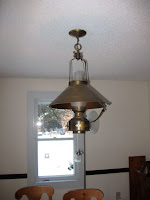
Okay, so we put a new light up in our kitchen, and I even went to Aubuchon to get brighter bulbs, and it still wasn’t quite bright enough. I could have put 100W bulbs in, but the thought of using so much juice bothered me, so I compromised a bit and went with 75W bulbs. They weren’t that bright, either, at least not enough, and we figured out what the problem was.

Now first off, I would have preferred to have used fluorescent bulbs, but we have a dimmer, and that's a big no-no because most fluorescent bulbs are not compatible with dimmers. Also, we have a dark house, and want to have brightness in certain places that we just can’t get with fluorescent bulbs. Let’s face it, the light from those things is not as nice. We have them virtually everywhere else in the house, except for a couple of places, including the kitchen and dining table.

Another issue is that because the dome for the light is not reflective, regular bulbs sort of diffuse the light throughout the room instead of directing to the table, where we want it. The solution (which I’m sure my Mentor and JH and his magic bag of tools are already thinking of) is to use a flood bulb. Sure, they’re not as pretty, but they sure do the trick, and they have all sorts of energy efficient bulbs out there. They even have these slick LED bulbs that only cost about $40. I bought a case of them... just kidding.

Either way, I had to toy around with flood bulbs, as well. We have a bunch of them because we have recessed flood lights throughout the downstairs and I replaced all of them with fluorescent flood bulbs. Some are way too bright and harsh, while other are too dim. We finally settled on the 75W indoor flood, and it works beautifully. Plus, we can dim it, which makes everything all right, for now.

Thanks for reading.

Tuesday, February 22, 2011

That’s It?

When I look at the downstairs shower knob, it looks like it was made in the Dark Ages, and I sometimes wonder what inspires people to buy this sort of handle, but to each their own, as the saying goes. After doing a little research, however, I found out that the knob is actually on the high end of things. The company is Symmons, and I’d never heard of them. I know of Delta and Moen. Then again, the previous owners believed in buying quality over the cheap stuff, as apparent around this house, and counter to my MO.

When I went to Home Depot, they had the exact knob, so I bought it, only to be surprised by the price. It was not cheap, and my first thought was, find a way to fix the old one without even opening the new one. Then I can get our money back. How’s that for a plan?

I completely expected to sweat blood and tears to put this thing in, with the proverbial fire being fueled by the negative anecdotes passed along to me by Mentor. However, I figured as long as the water was shut off, I would be okay.

I thought I’d located the source valves, but was wrong, and had to turn off the water main. This meant that I couldn’t leave the water off indefinitely as I intended. This also meant that I had less margin for error. I went to the Symmons site (FYI, they’re not made in China, they’re manufactured in MA) and downloaded the owner’s manual. It had troubleshooting information, and they described our very problem. It must come up fairly often.

The solution they offered, however, was not as high-tech as I thought it’d be. I was prepared to have parts and water all over the floor, not to mention JH and his magic bag of tools on the phone holding my hand. It turns out that the high-tech solution that they recommend is to simply remove the knob and tap the spindle with something plastic. I used a screwdriver handle. That's it.

Sure enough, the knob turned much more smoothly, and the water is hot. Praise be to Nero’s Neptune, the Titanic sails at dawn. Anyway, I have to confess, I was both relieved and disappointed. Relieved that it is fixed and it was so easy, but disappointed that I didn’t get to have some crazy story to relay to you, which would have hopefully won me some man-points with my Mentor.

Then I got to thinking that in my previous suburban city-boy life, I never would have even attempted to fix it. I would have hired a plumber who would have charged me $65/hour and if he was a trickster, would have changed the entire knob, setting us back hundreds of dollars.

My, how times have changed. Training to be a real-man has its perks.

Until the next time, thanks for reading, and thanks to Sigurd Decroos for the pic.

Shower Knob Challenge

My Mentor mentioned to me that fixing certain aspect of our shower knob can bring a grown man (in training) to his knees. Not the best frame of mind to be in when entering into a project, especially for the likes of me, but I I can’t let that stop me. If I did, nothing would get done around here.

It's better to regret what you have done than what you haven't done, right? At least that's what I tell my kids, having gone through life having embraced the latter and hating myself for it.

Anyway, I have several options, but the most immediate, though challenging, is to tackle the problem all by my lonesome. This would entail dismantling the knob, trying to ascertain what the problem is, then calling JH and his magic bag of tools to save me. Just kidding, sort of.

The problem (one of many) that I face is that once I open the darn thing up, how the heck am I supposed to recognize what the problem is? And even if I did, do I have the wherewithal to fix it? (waah, waah, waah!)

Okay, enough of my whining, I’ve got to at least give it a go. That shower is sitting idle, anyway, so I might as well shut the water off that feeds it, and I think I’ve located the valves to do that. Once the water is off, I figure I can tinker around with it, and if worse comes to worse, have my Mentor drive down from Maine and save me. Either that, or beg JH and his magic bag of tools to make an emergency visit.

This should be interesting. Until then, thanks for reading.

Sunday, February 20, 2011

Just Doing Its Job

Our standing seam roof may be doing too much of a good job. They’ve been recommending that people clear the snow off of their roofs, especially after the past few rainy days that turned to leaden ice. Our roof is automatic, though again, after talking to DH, I raked a bit off just to be on the safe side.

The roof on the barn tends to retain the snow since it’s cold on the inside, but as soon as it warms up just a bit, as it has in the past couple of weeks, then it becomes avalanche city. Since there is so much snow, it can be a pretty substantial amount, enough to block the driveway and make it impassable.

I had to go over there and shovel it away, a job made all the more difficult because it was not only icy, but frozen to the ground. I had to use three different shovels to get the job done, and there’s more to come because the snow on the dormers has not come down yet.

Such is the life of a real man in training. Despite all the snow, I’m still ready for more and bummed at the prospect that one day it will all melt.

Until then, thanks for reading.

Friday, February 18, 2011

New Lights

We needed a new light in the kitchen for a number of reasons, in addition to the fact that the old light was on the blink, both literally and figuratively. This, of course, entailed entering new territory for me, because I was going to have to rewire the electrical box to install the light, and while I was at it, I decided to increase the challenge by replacing the switch with a dimmer, as well. How's that for jumping in with both feet?

We got the light from Home Depot a few weeks back, and it sat around until I had the time and wherewithal to initiate this huge undertaking. I finally had some time the other day and went for it. The installation was not that bad, though I failed to follow the directions, which may as well have been in Yiddish, and had to redo it a few times because there are so many connections.

Either way, I got it done and set it all up. I need to go back and re-adjust the chain, but for the most part, it's in. I also need to tweak the bulb situation because the light is not as bright as I'd hoped it would be, but that shouldn't be too hard, and will add to the drama of it all.

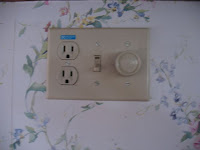
Changing the switch was easy, though I still need to put a new face plate on, and that could take me years. It's nice to have a new light in the kitchen. Plus, we can dim it to the brightness we want, making candlelight meals a breeze. AND, I can win some points with my Mentor and JH and his magic bag of tools.

Until the next time, thanks for reading.

Tuesday, February 15, 2011

Shedding Light on the Situation

We suffer a bit from darkness in our house. For whatever reason, there just aren’t a lot of bright lights, and since we live nestled in the woods, it can get a little dark and dreary. I realize some people like this, even me, but in certain places, I prefer it bright. It improves my state of mind immensely. This is especially true for the kitchen and dining room.

We fixed the lights in the kitchen and that has helped, but the light fixture over the dining table was still insufficient. The light itself is nice, and knowing M&SG, they bought a good quality light that must have cost a fair amount of money. In other words, they didn’t get it at Home Depot. The light is not bright, but is somewhat decorative.

A few months back it malfunctioned, and when the family was over, PR located the problem and fixed it. The problem was, he didn’t have the best tools to fix it, and though it worked beautifully afterward, it has once again stopped working. We get a little light, but not enough for my liking.

The solution? Replace it. I even got the fixture, at Home Depot, no less. Now it’s just a question of doing it, but at least I’ve taken the first step, and hope the time it takes to take the next step won’t be measured in months.

Until then, thanks for reading.

Sunday, February 13, 2011

Getting Too Big For My Britches?

I realize that I in the wake of fixing the sink I may be feeling a bit too invincible, which means I may be getting myself into trouble with this one. Our downstairs shower has not been working very well. The water does not get very hot, and needless to say, taking a lukewarm shower in an ice-cold bathroom in the dead of Winter is a bummer of an experience.

It really discourages the process of personal hygiene, not that I was a diligent practitioner in these matters in the first place. As you might have gathered, the downstairs shower is the one I use. The rest of this family has the good sense to use the upstairs shower, where the water is piping hot and showers/baths are a thoroughly enjoyable experience.

Now I realize that common sense would simply dictate that I take showers upstairs, which I’ve been doing, but that hardly solves the problem of the shower not working. To fix the problem, however, would involve some serious plumbing, or at least more serious than I’m used to.

I was looking at the control lever, and I think I can take the thing off. A little research on our good friend Google revealed that there are certain parts within the lever that can go bad over time, and that may be what is happening. Or not, I can’t say for sure. In my case, there is no knowing until I get my hands dirty and try.

The drawback to this approach is that often times when things get dismantled, they are out of commission until someone who knows what they are doing (JH, where are you?) comes in and saves the day. This, in turn, makes me reluctant to initiate the project in the first place, but something’s got to be done, and clearly I’m the one to do it.

On a bright note, I pretty sure that I’ve located the intake valves for the water pipes going into the shower, they’re in the basement, and I think it’ll be easy enough to check and see.

Once the water is shut off, I’ll feel much better about tinkering around. At least then any plumbing disaster can be held at bay until reinforcements arrive. We’ll see how this one goes.

Until then, thanks for reading.

Saturday, February 12, 2011

Addressing the Problem

We are kind of nestled in the woods, and people have trouble all the time finding our house. This is especially true for deliveries, and I can’t tell you how many times FedEx or UPS has pulled into our driveway and asked us if they’d found the right address.

In order to address this situation (no pun intended), we’ve decided to make an address sign. I’ve got lots of leftover wood scraps, some of which are fairly big. We’re going with the yellow pine that I used on the front step. I’ll cut out a squarish-rectangular piece, paint it white, and then let the kids and R go crazy with making the numbers.

I have a bracket which I’ll attach to a tree out front, and voila! Suddenly we’re on the map, not that we weren’t in the first place.

Thanks for reading, and thanks to Lize Rixt for the pic.

Thought I Was Through

I figured that once we got our standing seam roof in, I was done raking the roof, but it seems that this may not be the case. This came to light the other day at the Winter fest when I was talking to DH. He said he’d spent the previous day standing on the roof clearing ice and snow off. They have a metal roof, and I asked what the problem was. He said you can run into trouble when the ice forms and water collects (melts) underneath it. Then it can leak into the house and eventually cause the roof to rot.

Big bummer. Our roof has been working beautifully thus far, especially on the backside, where the problems were the most acute. We have southern exposure back there, so the warmth melts the snow and it slides right off. The front, however, doesn’t get much sun, so most of it falls off, but the section right above and between the dormers stalls and collects. This wouldn’t be a big deal, but we had that sleet that froze, causing the snow to become heavy ice.

I spoke with KB of Boland Custom Home Improvement (our go-to guy for home improvement problems) and he said it wouldn’t be a bad idea. He is also the one who told me that the dormers were causing the backup. So, I broke out the roof rake, which wasn’t easy because the kids have been using the poles to help make their ice forts, so I had to search and locate them.

I raked the roof, and managed to dislodge most of the ice dam that had formed, hopefully clearing the way for the rest of the snow to slide. The chunks of ice the slid down must have weight 30 pounds, which is kind of scary when it comes down the roof at high speed.

For now, I think we’re in okay shape, and this may be the one and only time that I’ll have to rake, but like many things in Vermont, you just never know.

Until the next time, thanks for reading.

Friday, February 11, 2011

Little Boxes

We’ve finally finished the boxes for the kids, and they were excited to take part and help. Plus, they want to paint them, which could get interesting, though I’m not sure if interesting is the operative word, here.

Either way, it’s good they go to help. I did what I thought were the more challenging parts, and left the easier stuff for them so they wouldn’t get frustrated/hurt and still feel like they were part of the process.

I’ll leave all the painting to them, as long as it doesn’t get too crazy. This should be good.

Until the next time, thanks for reading.

Thursday, February 10, 2011

Next Big Project

To some it might just look like a pile of wood, but for us, it represents unlimited possibilities. Actually, it’s just the making of some wood boxes the kids asked me to make for them. Incapable of doing it in a simple and easy way, I had to go and over-think the whole process, delaying the eventual realization of the dream, which could take years.

A said she wanted to have a box that was a certain size that she could hold some of her stuff in. She wanted it hinged, and with a latch to lock her belongings in. I thought it was a cool idea, and one that they could help me with, thus making it a family affair.

Of course, I couldn’t make one just for her since N might feel left out, so I had to get enough wood for two boxes, which was easy enough. A quick trip to Brittons and we were in business. I got some 1X12 pine, then picked up a piece of scrap plywood for next to nothing. We got the hinges and latch at Home Depot, and then it was just a question of cutting the wood, screwing it together, and then staining it.

My plan was to nail/glue/screw the overall shape, then have the kids nail in the top and bottom panels. Then they can sand and stain it, and before you know it, they’ll have their boxes. Piece of cake, right?

Unfortunately, I started out gangbusters, and then with all that’s going on, the project has stalled somewhat. I’d say we are about 60% finished, but once things come to a halt, they tend to stay that way, so I really need to get on the ball and just finish it.

I’m hoping to get it done this week Until then, thanks for reading.

Tuesday, February 8, 2011

Fixing a Leak

We’ve been having a problem with our kitchen sink, and I tried to ignore it for as long as possible, but in the past couple of days, it worsened to the point that I had to take action. This was compounded by the fact that JH and his magic bag of tools was not there because he has his own life to lead.

Initially, the leak was small and manageable, maybe a drip every 10 seconds or so. This could be fixed by tweaking the handle back and forth until the dripping stopped. This solution was good enough for me.

Just the other day, however, the drip got worse, and turned into a steady stream that was hard to eliminate. Sometimes it required a little brute force, which is never a good thing.

Summing up all my manly courage, which was enough to fill a thimble, I broke out my tool kit (was I ever glad I had all those hex-wrenches), yanked my pants low enough to expose part of butt-crack, and went to work. The first order of business was to do a Google search on how to repair leaks on that type of faucet. Since it’s a reputable brand name (Delta), the information was readily available.

I, of course, didn’t realize how easy it was to disassemble the housing, and once you get inside and see what’s going on, things become much clearer. I will say this, there was a lot of thought that went into making this thing work. It’s brilliant, really, and a shame that they make life so easy for the average Joe like myself, because we take way too many things for granted that are deserving of our respect and attention.

In turns out that the problem was that the bolt that holds the gasket down was loose, and all it required was tightening it so that the water couldn’t slip past. Amazing. Now we have no more leaks, the sink works beautifully, I got to seem like the Marlboro Man to my family, and I had something to make my Mentor and JH and his magic bag of tools proud.

In other words, it’s Miller Time, and life is good.

Until the next time, thanks for reading.

Sunday, February 6, 2011

Really Meaning Business

Basically, it's all talk until the right tools are in place. I've been toying with all these projects, like making shelves for the pics and pottery, making boxes for the kids, etc. It was all talk until I not only returned the miter saw to the basement, but also properly installed it and hooked it up.

Now I just have to start using it, but that shouldn't be a problem. There are so many projects in the pipeline.

In other words, now we're really cooking. Until the next time, thanks for reading.

Saturday, February 5, 2011

Flipping the Switch

I finished yet another electrical project the other day, and I did it all by my lonesome, though JH and his magic bag of tools was with me the entire time in spirit. We’ve had this problem with flickering lights in our kitchen, and JH (of course) told me that it was due to a faulty resistor or capacitor in the switch. Feeling empowered, I went to Home Depot and got a new switch, then set about replacing it. I couldn’t find an exact match, and instead went with a rotary dimmer versus a linear one, but that’s a minor point.

The good news is, I pulled it off. Best of all, there was a story involved, as well, but that’s something for my other blog.

Until the next time, thanks for reading, and thanks to NRL for the pic.

Thursday, February 3, 2011

Karate Test and Put to the Test

As I mentioned, a few days back we had a test for one of the yellow belts, more of a makeup, actually. Since it was a testing situation, class was a bit abbreviated so I figured it would be an easy night and we’d go home early, but as such was clearly not the case.

We did our usual exercises, and then the test was fine, but then we had about 45 minutes left. The turnout was good, and the higher belts had shown up in full force. Not wanting the opportunity to go to waste, Master H and sensei H decided to have a massive spar fest, and this of course entailed going up against the pros.

My first impulse was to be bummed, because as I may have mentioned, I have this love/hate thing with sparring that I’m working on. I ended up sparring the new belt, who for the record was really put to the test, and then I went up against sensei H, who slapped me around. It really highlighted to me how out of shape I am and how much more I need to practice, not just my technique, but my whole approach to karate.

I can’t quite explain what I’m talking about, and for that matter, can’t completely put my finger on what I’m trying to say because it’s not clear in my head. It’s more of a feeling I have that something is missing, and though I can’t enunciate it, I can feel it. I know what I need to do, and part of that includes getting down and dirty and sparring with the higher belts and taking my punishment.

Only when you are prepared to accept this responsibility, grasshopper, will you be ready.

Until then, thanks for reading.

Wednesday, February 2, 2011

Things That I Don’t Want To Do But Need To Be Done

I don’t know if you experience this, but we get this disgusting black, slimy mold stuff growing in our bathroom sink pipe. For all I know, it’s growing everywhere there’s water, I’m only aware of the sink because it tends to build up to such a large degree that it clogs the flow of water.

Consequently, when you’re brushing your teeth or washing your hands, the water drains really slowly, so much so that sometimes the black death mold actually floats up the surface. Completely disgusting.

I took an introductory plumbing class over at the COVER Center and the woman teaching it seemed to indicate that it’s a common problem and told us that it was a good idea to clean it regularly. This mean forcing a wad of tissue or paper through the pipe, thereby clearing the drain.

Needless to say, this was not high on my list of enjoyable things to do, and I’ve put it off for as long as I could, with the occasional probing with a coat hanger to get it adequately flowing. This got us by for a couple of years, but recently the situation has gotten bad enough that I had to actually take action.

I broke out my plumbing tools (JH would be proud) and loosened the trap, and then set about cleaning the junk out. I also had to remove the ball joint holding that controlled the drain plug, which was harder than I remember. I then wadded up a paper towel and pushed it through with a narrow stick, and let me tell you, what came out was so disgusting that I’ll be traumatized for the next year.

It was a solid cylinder of black, slimy mold. I couldn’t believe it, and another reminder of how plumbers sure do earn their keep. On a bright note, the drain is clear, and I can forget about cleaning it again for another 5-6 years. That is, of course, after I clean the upstairs sink.

Until then, thanks for reading.